Backing Up a Database in SQL Server Management Studio 2018
 Open SQL Server Management Studio
Start by opening SQL Server Management Studio. If you don’t use this program often, you can find it by pressing the Windows key and searching ‘SQL Server’. The program you’re after will have an icon with a yellow cylinder in the top left and some tools in the bottom right.
Connect to the Server
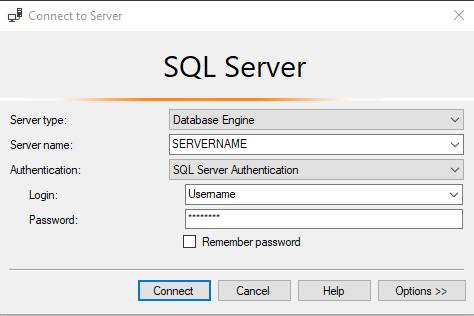
Once it finishes loading, you will need to connect to the server that holds the database you want to backup. If you don’t know the correct credentials you will need to contact whoever manages the databases to get the login and password if Windows Authentication does not work. The login screen should look like this if you’re using SQL Server 2018.

The dropdown menus will help with remembering the server name
or login if these fields are blank initially.
Selecting/Finding the Database to Backup
After logging in you will see a window called Object Explorer on the left side if the screen. If this is missing for you, you can recover it by clicking View>Object Explorer up the top or by clicking F8. The top parent in this dropdown tree will be named after the server name you used to log in. Under it should have most the following folders.
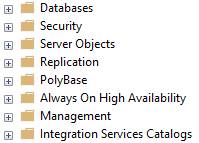
If you can see these folders, click on the ![]() icon next to Databases to expand your available databases. There should be at least two sub-folders called System Databases and Database Snapshots as well as the databases attached to this server. They will be indicated similar to this:
icon next to Databases to expand your available databases. There should be at least two sub-folders called System Databases and Database Snapshots as well as the databases attached to this server. They will be indicated similar to this:
![]()
Find the database you’re after and select it, by default the Database is named MEXDB.
Opening the Backup Options
If you can see the database you want to backup, right click on it to open a list of options.
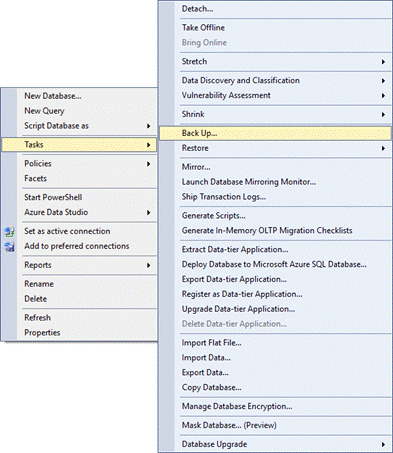
On the first option box, move down to the fourth option Tasks and then in the new window, select the fifth option down Backup… and click on that.
Configuring the Backup
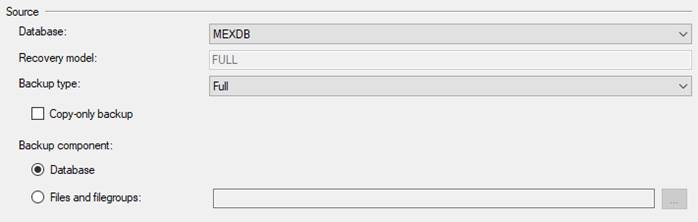
The window that comes up is the Back Up Database options. Since you selected this database to open this window, a bit of information should already be filled in for you,
Under Source, you want to make sure the database is the one you selected and the backup type is Full. The backup component should have the radio button next to the Database option.
Under Destination you can choose where you want to save the backup. It should try to save it into a default location near where the original database currently resides. If you want to save it to your desktop or somewhere else, Remove this entry and then click Add…
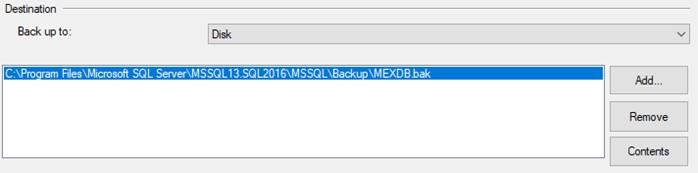
This will open a new window to choose the destinations on disk, A location based upon the default will already be selected
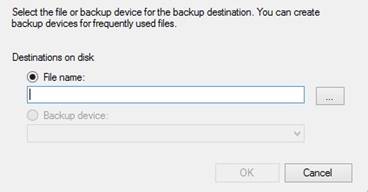
In this window, choose the file-path you want to save the backup to. Click on the ![]() buttons to expand the folders and navigate to the destination you’re after. Leave the Files of type as ‘Backup Files(*.bak;*.tm)’ and enter in the name you want in the File name section with .bak at the end.
buttons to expand the folders and navigate to the destination you’re after. Leave the Files of type as ‘Backup Files(*.bak;*.tm)’ and enter in the name you want in the File name section with .bak at the end.
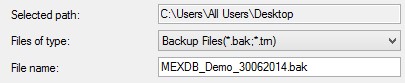
If you’re doing this backup for a MEX Support representative, give it an informative name that will help us identify it again if you need it back in the future. An example of good naming conventions would be:
MEXDB_YourCompanyName_DDMMYYYY.bak
Once you have the destination, file type and name correct, click OK and then again to confirm this save location. You should be back on the Back Up Database options screen again.
Note: If you are wanting the schedule these backups please see our tech tip: Scheduling Backups in SQL Server (This requires a paid licence of SQL)
Preparing the Backup for Sending
If the backup went well, a window should appear telling you that the back was successful. You will now need to find this .bak file and prepare it for sending.
Once you’ve located where it was saved, it should look similar to this:
![]()
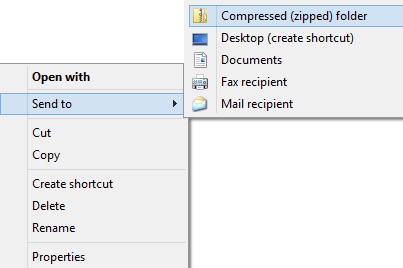
This isn’t a big database, but it will still require 114MB to upload it. So it is beneficial to both MEX and your own company to compress it first. To do this, right click on the file and then select the Send To option. Near the top of the list should have Compressed (zipped) folder, click on this option.
A progress dialog will open showing how much it has processed, once this has finished, your database is now backed up, compressed and ready to send!
If you have any questions about this procedure please contact our Support team at support@mex.com.au or call +61 7 3392 4777