
Setting up Regions in MEX
You’ve purchased MEX Regions and now need to set it up on your MEX database. In this article, we guide you through the process of creating a brand-new region, moving data into this region and assigning your users.
MEX Regions is a great tool that allows for the separation of data between two or more sites. For a great explanation on Regions, have a read of a previous blog article on Regionalising Your Data in MEX. The article explains how it works, what modules in MEX can be regionalised and the general rules behind the Regions module.
Please note that Regions is not included in a general MEX database as it needs to be purchased separately before use with MEX.
Once you have purchased and registered Regions on your system, check to see if the Regions functionality is available by selecting "About MEX" from the MEX Hamburger Menu.
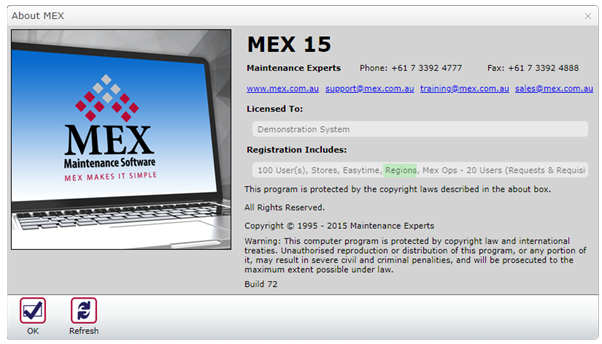
MEX Help Menu showing the databases registration details
Setting up Regions
Here are the instructions to set up a new Region in MEX:
- From the MEX Main Menu click the Control Files Button
- Under Administration Functions select Regions Setup
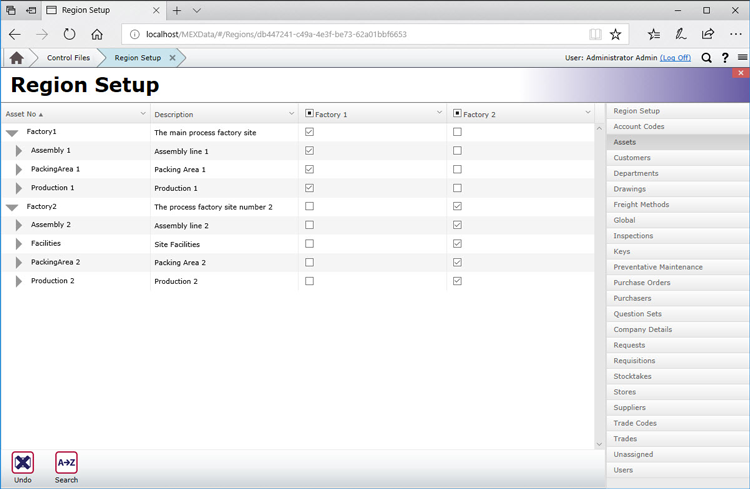
Regions Setup Form in MEX Settings. The left pane is the entities you are regionalising, the right list is a list of every entity that you can place in a region in MEX. This is where administrators can choose what data is to be separated and into what Region.
- Click the + Button. This will add a new Region to the list of Regions along the top
- Enter the new Region’s Name and a Description
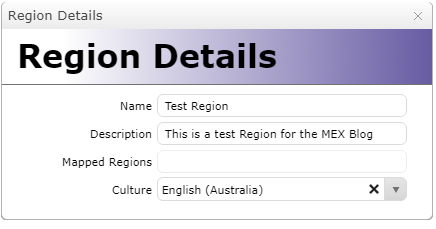
- You are now ready to configure your Region.
Configuring the New Region
Once the Region has been created, you will need to define what information the Region’s users are able to access. The Regions interface has been significantly improved in MEX 15 and is now very intuitive for users.
Each tab on the right-hand side of the form represents different pieces of information in MEX. Within each tab are two selectable lists. The one on the left shows the information available for selection, and the list on the right is all the ones selected from the list on the left to be shown in that Region.
Tabs available for the Regions configuration.
Here are the steps involved in configuring the new regions data:
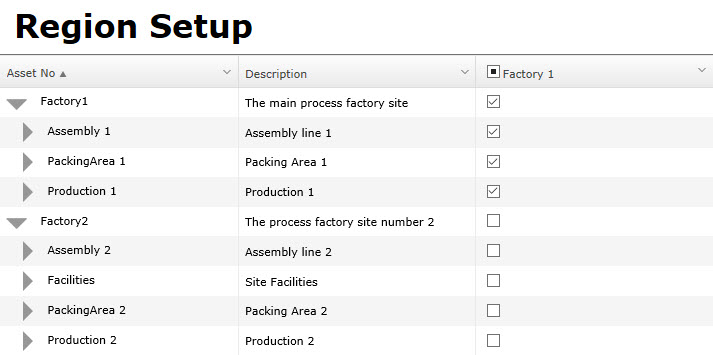
- Select one of the tabs to work with. For this example, we will select the Assets Tab
- This will display a checkbox which is used to assign Assets into Regions. Regions are displayed across the top. The Asset Register is displayed down the side.
- Locate the items you wish to assign to a Region. Click on the Checkbox to add the item to a region. Keep in mind that when checking an asset, the parent and children are transferred as well.
- If you make a mistake and move across the wrong one, don’t panic just select the Asset in the list of the Regions Assets and untick the checkbox to remove it
- Continue this method with the other tabs until all the data you need to be accessed in the particular Region has been transferred.
- Close the Region Setup form by clicking the “X” in the top right- hand corner to save the new Regions settings.
Assigning a User to a Region
The Users Entity controls which region a particular MEX User is assigned to. When that user logs into MEX, they can only access the information set up for the Region they have been assigned to. This tab consists of a user listing and drop-down menus to select the assigned region.
Contrary to MEX v14, the Admin user cannot be assigned a region in MEX v15. This is so they can see all setups and properly administer the system. Also remember that each user in MEX may only belong to one Region.
To Assign a Region to a user simply:
- Select the User from the list
- Select the Regions Drop Down List
- From the resulting list select the Region you want this user to be assigned to
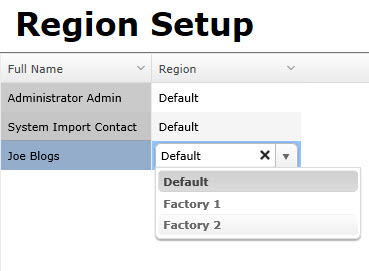
Do this for all users you need to be assigned to that Region.
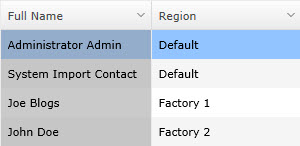
A note on the Default Region
The Default Region is a pre-existing region inside of MEX. The region doesn’t appear in the list of regions inside the setup but users can still be assigned and removed from it. The default region acts as a control for the regions and has access to all of the MEX data, regardless of region. This region is recommended for management and administration users.
Region Mapping
MEX has a system in place called Region Mapping designed to ease administration, the set up process and simplify data entry. Where by, Regions can be mapped to one another so when records are added by a User in one Region, then the same records will be available in related Regions.
Region Mapping can be accessed through the Region Mapping tab under each Region on the Regions Setup form. Mapping regions together can then be carried out by assigning a Parent Region and Mapping Child Regions to it. This functions similarly to Asset parent/child relationships.
Need Help With This?
For more information or help with this, contact the MEX Support team at support@mex.com.au or call +61 7 3392 4777.