
Configuring SSL on Your Server
Here at MEX we recommend the use of a secure MEX site through SSL (Secure Sockets Layer) so that you not only safeguard your site but also adhere to https browser requirements such as chrome, where secure sites are now mandatory. The latest MEX apps are also designed to work with secure sites, as the online community, app platforms and browsers move towards a safer internet experience.
MEX offers SSL to all our Hosted Customers, to allow for a more secure connection to all your valuable data that is stored on your Database on the hosted service.
For those of you that host your own data and are looking to set this up on your server, here is a simple guide to setting up your own SSL on your own server.
Setting up SSL on your Server
Firstly you will have to find a suitable and reliable company that offers SSL Certification. There are a few companies that offer this service; Go Daddy, Verisign, Comodo, Digicert and Thawte. Here at MEX, we like to use the best services to ensure that all our customers are fully looked after when it comes to security, so we use Go Daddy. See more info about Go Daddy here.
Once you have spoken to your chosen SSL Provider, the next step will be to setup your MEX IIS server with this Certificate, see below for an IIS 8 certificate setup guide;
Create a Certificate Signing Request (CSR)
- Open IIS Manager and navigate to your Main IIS website
- In the middle panel, double-click on the Server Certificates tab to open
- In the right-hand panel, click the ‘Create Certificate Request…’ link
- Fill in your Details;
- Common Name: Is the domain name or URL of your company
- Organization: Your Organization Name
- Organization Unit: Location of Server, i.e. HR, Engineering
- City/locality: i.e. Brisbane, Sydney (do not abbreviate)
- State/province: i.e. Queensland, South Australia (do not abbreviate)
- Country/region: two letter code for your country
- Click Next and select ‘Microsoft RSA SChannel Cryptograhic Provider’ with a bit length of ‘2048’ or higher and click Next
- Click the eclipses button to browse for a location to save the file, then click Finish
Send the Request to your SSL Provider
- Locate the file that you saved (in the previous step) and copy ALL of the text
- Log into your SSL account and locate to the SSL Certificate Page
- Contact your SSL Provider for further information about how to send this code to them
- Once the code is received and processed, you will be able to download the certificate
Apply Certificate to IIS
Third step is to apply this Certificate to your IIS Server and each website that you wish to apply it to
- Save the certificate onto your server
- Open the IIS Manager and navigate to your Main IIS Website
- In the middle panel, double-click on the Server Certificates tab to open
- In the right-hand panel, click on the ‘Complete Certificate Request…’ link
- Click the eclipses button and navigate to the certificate, selecting the certificate with the (.crt) as the extension
- Give it a Friendly name (so you can recognize it)
- Leave the cert store as Personal and click OK
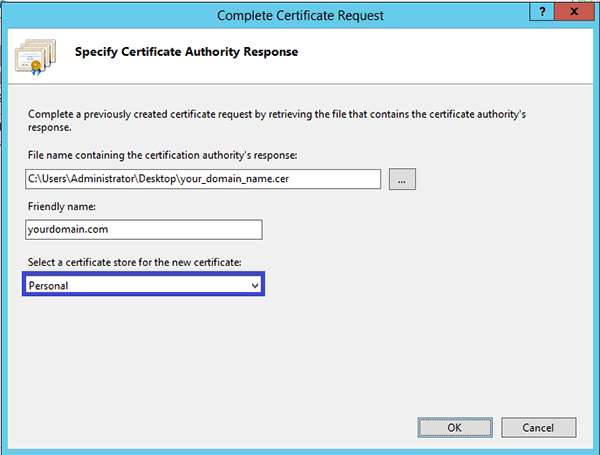
Complete Certificate Request Form
Configuring Each Site
Now that it has been added, you just have to apply it to each website
- Expand sites and click the desired site, in the right-hand panel click the ‘Bindings…’ link
- Click the ‘Add…’ button and add the following details;
- Type: https
- IP Address: an IP address or leave default as ‘All Unassigned’
- Port: 443
- Host Name: your connection name. e.g.. hosting.mex.com.au
- SSL Certificate: Choose the certificate name that you just added
- Click Ok
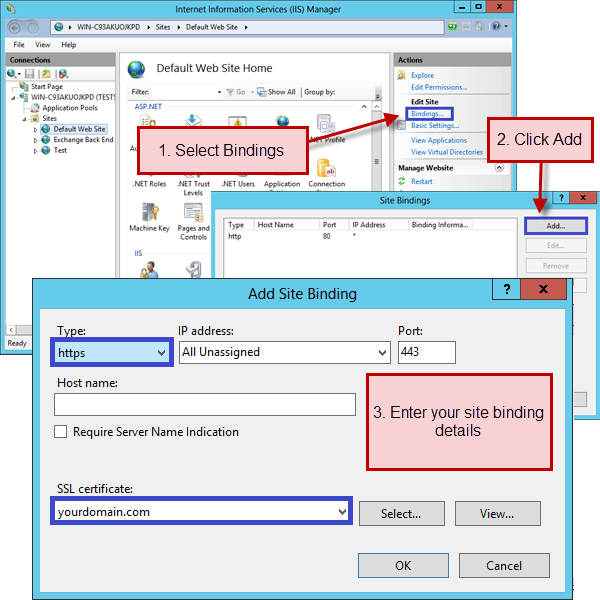
Site Binding Setup
The certificate has been added and now you can browse to your website and connect to the MEX Mobile App using https.
Hope this comes in handy!