
Updating Component Readings in MEX
Are you sick and tired of entering in multiple readings for child assets? Wouldn’t it be nice if you could put in one reading and it would just flow down to its children assets?
Well you can do just that, using the Update Component check box when entering readings. Before the magic happens you will first need to setup a few things.
Most importantly, you will need to make sure that the Parent Asset has a reading logged against it, and that the children also have a reading of the same type recorded. As a bare minimum, the Assets don’t need to have any data saved against them in any other part of the system, they just need to be in the Readings module, and that’s it. It’s important to note that if both the Asset and its child are not the same frequency type they won’t be updated.
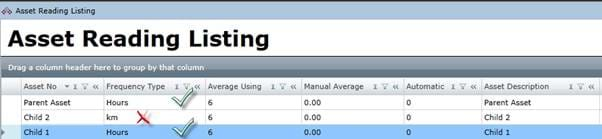
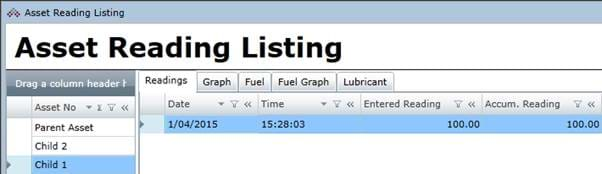
Illustration of a Parent and its two Child Assets. Child 1 has the same Reading Type
and will be updated, Child 2 is different and won’t be.
Updating Components
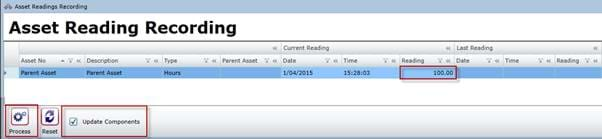
To add in a new reading to your Parent Asset, do the following:
- Go to the Readings Module.
- Select the Parent Asset you want to add the reading against.
- Click the Single button on the right hand side of the form.
- This will open up the Asset Reading Recording Page.
- Add in a reading by filling out the Reading field.
- Check the Update Component checkbox.
- Process the reading by clicking the Process button.
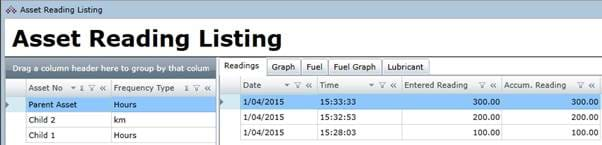
If you now look the children will have the reading for them, Child 1 should have been updated along with the Parent.
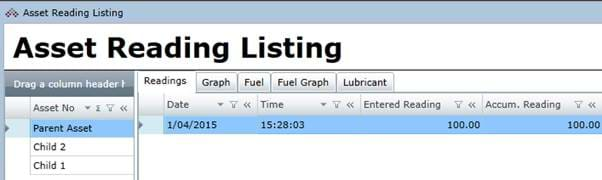
The reading has been processed for the Parent Asset.
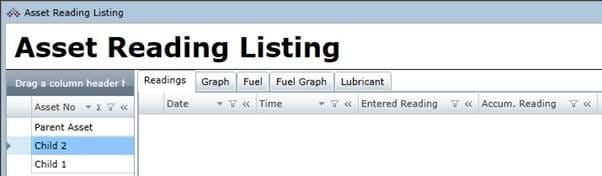
No Reading has been added to Child 2, as it does not have the same reading type as the parent.
Child 1 has been updated as well.
How does MEX update the readings?
While this is all well and good, it’s always good to understand what MEX is doing behind the scenes. When you click Process whilst having the Update Components check box ticked, MEX goes through and finds the difference between the last reading and the new reading and sends that down to the children. It is not populating the children with the new reading of the parent, but it’s the calculated reading that is populated for the child.
For example;
- You have a parent asset with a last reading of 200 hours.
- A child asset with a last reading of 50 hours.
- If you add a new reading of 300 hours against the parent and you tick the update component check box, MEX calculates the difference between the hours of 300 and 200 to be 100 hours.
- This will then work out to be 300 Hours as the new reading for the parent.
- And 150 hours (Last reading of 50 + the difference of 100 hours) as the new reading for the child.
Readings entered against the Parent Asset
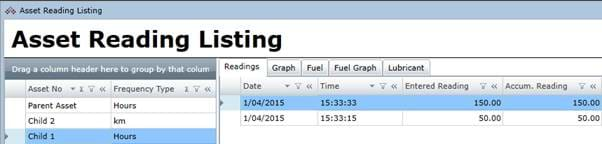
The Updated Child reading, which includes the newly calculated reading.
While some will argue that it should be the same as the parent, we have done this for a reason. If the different children have their own meter readings, and their meters breaks down. Entering the same reading as the parent will only cause confusion, especially if they know that the reading will be 150 hours, but what’s being shown are readings in the 1000’s if the parents readings are just passed down.
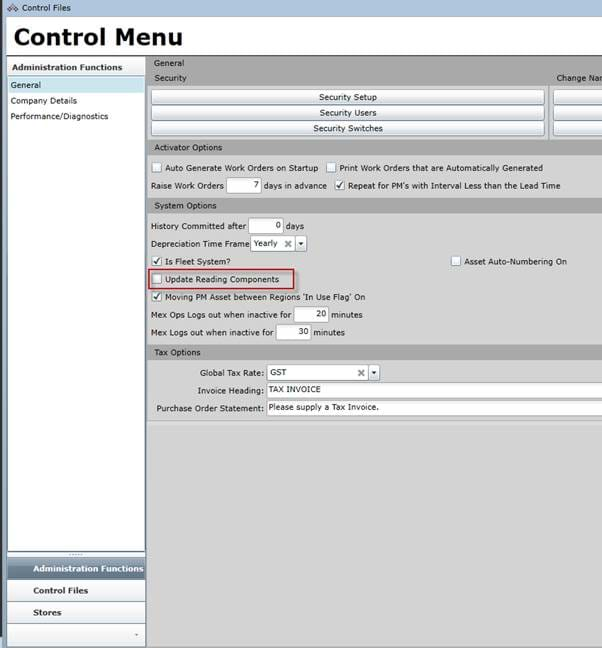
Additional Tip: If you want the Update Component check box ticked all the time:
- Go to the Control Files.
- Tick Update Components.
- This will remain ticked within the Add readings form for use each time you update your readings. For an Asset.
Need Help With This?
For more information or help with this, contact the MEX Maintenance Software Support team at support@mex.com.au or call +61 7 3392 4777