
Using Custom Views in listings in MEX V15
In the latest build of MEX V15 there is now the ability to add in additional fields to listings that may be outside the fields already available through ‘Add Listing Columns’. This means users now have more flexibility to enhance their listings by pulling in additional data not previously available.
For example, in the past in MEX, you were able to add a custom data driven field to a Work Order and then add that field to the Work Order Listing through ‘Add Listing Columns’ – but now by using Custom Views in MEX this data will load much faster and put less load on your server’s resources.
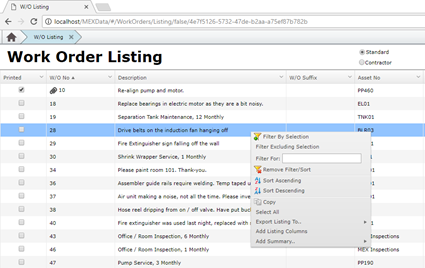
To access Custom Views, simply open a listing and right-click anywhere to access the context menu, and select ‘Add Listing Columns’;
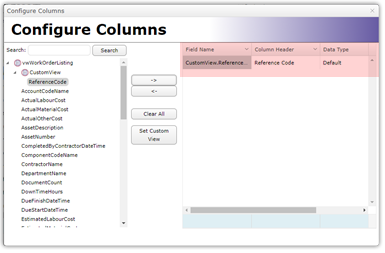
From here, select the button in the middle that says ‘Set Custom View’;

This opens up a box to accept an SQL query. The query must reference the primary key ID field on that particular listing as a minimum, and then you’re able to join in other tables and reference other fields from there to create a custom view. You’re able to get the name of the listing’s view from the top of the left-hand panel in the ‘Configure Columns’ screen. For example, in the Work Order Listing, the query at a minimum would need to start with;
SELECT vwWorkOrderListing.WorkOrderID FROM vwWorkOrderListing
From there, you’re able to add additional data by joining in related tables, or by constructing fields based on currently existing data. This will require a basic knowledge of SQL – if you’re short on SQL skills, feel free to get in touch with MEX Support and we may be able to push you in the right direction and give you some advice on what you’re hoping to achieve.
Example 1: Adding Constructed Fields
Say you have a reference code that you use for each Work Order, based on other fields in the Work Order Listing – for example, that reference code is made up of the Work Order Number + first letter of the Job Type + first letter of department + first two letters of the Asset. You could add that in by using the below query;
SELECT vwWorkOrderListing.WorkOrderID, CONVERT(nvarchar(10),vwWorkOrderListing.WorkOrderNumber) + '-' + LEFT(vwWorkOrderListing.JobTypeName,1) + '-' + LEFT(vwWorkOrderListing.DepartmentName,1) + '-' + LEFT(vwWorkOrderListing.AssetNumber,2) AS ReferenceCode FROM vwWorkOrderListing
Once you have entered that in the Custom View field, and closed out, you will see it appear in the Custom View expandable drop-down on the left-hand side titled ‘CustomView’;
Then using the à arrow, you can add in the field (in this case ‘ReferenceCode’) into the list of columns to appear in the listing. Once you have done that, scroll to the right of your listing and you should see your newly added column;

You can then reposition this column to wherever you would like in the listing.
Example 2: Joining in other tables
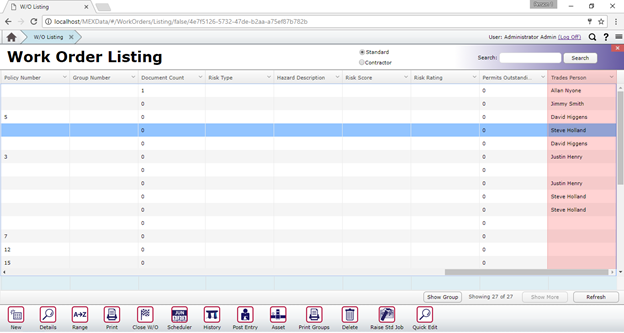
A common query from customers is that they would like to be able to see Trades tab data in the listing. Unfortunately, because this is a ‘one-to-many’ relationship, in that one Work Order can have many Trades lines, this isn’t feasible to include on the Work Order listing. However, if you are a customer that often only assigns one Trade line to each Work Order, then it is possible to pull back information about which Tradesperson is assigned to what Work Order and include that in the listing.
Using the query below, we can select the first Trades line on the Work Order (in the event there is more than one) and join it into the listing;
SELECT vwWorkOrderListing.WorkOrderID, TradeData.TradesPerson FROM vwWorkOrderListing
OUTER APPLY (
SELECT TOP 1 C.FirstName + ' ' + C.LastName AS TradesPerson FROM WorkOrderTrade WOT
LEFT JOIN Contact C ON C.ContactID = WOT.TradeContactID
WHERE WOT.WorkOrderID = vwWorkOrderListing.WorkOrderID
ORDER BY WorkOrderTradeID
) TradeData
Once you put that in the Custom View field, as with Example 1, you can then select the field from the left-hand panel in the Configure Columns screen;

You will then see your newly created field to the far-right of your listing and can reposition it as you wish;
Example 3: Creating a Validation Field
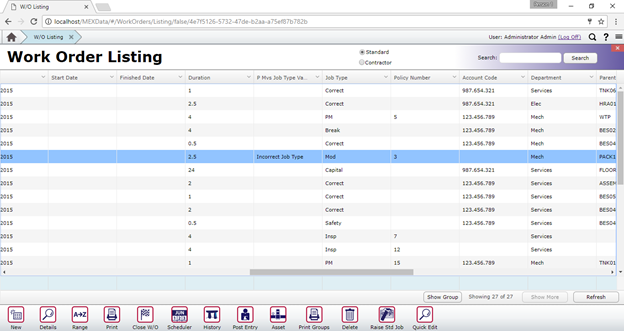
Say you would like to validate whether the Job Type on any Work Order raised from a PM/Inspection doesn’t match what you’re expecting (e.g. the Job Type could be ‘PM’ or ‘Insp’ to separate these jobs from Corrective and Breakdown work), then you could add a field that would display a validation message for you when this is not the case. An example query below;
SELECT vwWorkOrderListing.WorkOrderID, CASE WHEN (vwWorkOrderListing.PreventativeMaintenanceNumber IS NOT NULL) AND (vwWorkOrderListing.JobTypeName NOT IN ('PM','Insp')) THEN 'Incorrect Job Type' ELSE '' END AS PMvsJobTypeValidation FROM vwWorkOrderListing
This query says that wherever there is a Policy Number (i.e. the Work Order has been raised from an Inspection or a Work Order) and the Job Type field is not display PM or Insp, then to flag it as ‘Incorrect Job Type’. As with the previous examples, this would then appear in your listing as below;
As a reminder, writing these SQL queries for Custom Views is not covered by the Support agreement, however our team are always on hand to help answer your questions as best we can, and steer you in the right direction to get the data you need in your listings. You can reach MEX Support on support@mex.com.au or on +61 7 3392 4777.