
Connecting the MEX iOS app
MEX needs to be installed on a few iOS devices and they all need to be connected to the right server. So let’s start from the very beginning, Downloading and Installing the MEX iOS app.
Downloading the MEX iOS app
The MEX App can be downloaded from the App store on your iOS Device. To download the app:
- Open the App Store on your iPad
- Up the top right, search for MEX.
- The MEX App will be the first result, so tap on it and select Install.
- When prompted for an username and password enter your apple ID
MEX will start downloading and after a minute or two, it will be fully installed on your system.
Now, it’s time to open up MEX and get it connected to your data.
Initialising the MEX iOS App
Open the MEX iOS app and the first thing you’ll be asked to do, is to select your language. Go ahead and choose your default language.
In the next screen, you will be asked to select one of two options:
- I am looking to try out MEX and would like to view a demonstration
- I am an existing Customer and would like to connect MEX to my own data.
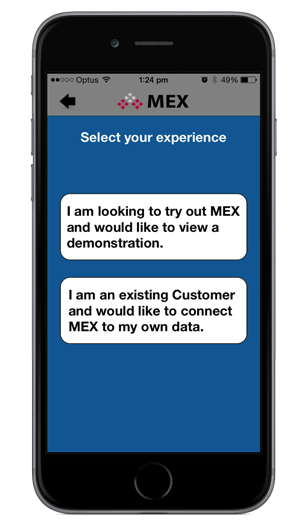
Select your MEX Experience Options
For MEX customers go ahead and select the second option.
Configuring the MEX Server Connection
In order for the app to access the MEX database, we will need to tell it where to look. There are two ways to do this.
- Using the automatic Find my Server option
- Manually Entering in the address of your server
Find my server
The MEX iOS app has the ability to instantly search through the network your device is connected to for any references of the MEX server.
Here is an article further explaining the MEX iOS Find My Server Function
To begin searching simply tap ‘Find my Server’ and MEX will automatically scan your network for a MEX server. Do note that this function won’t work if you’re on a 3G or 4G mobile connection or if MEX hosts your server.
At the end of the search, the server results will be shown allowing you to select the correct server. All you have to do is click on it and you’re connected and ready.
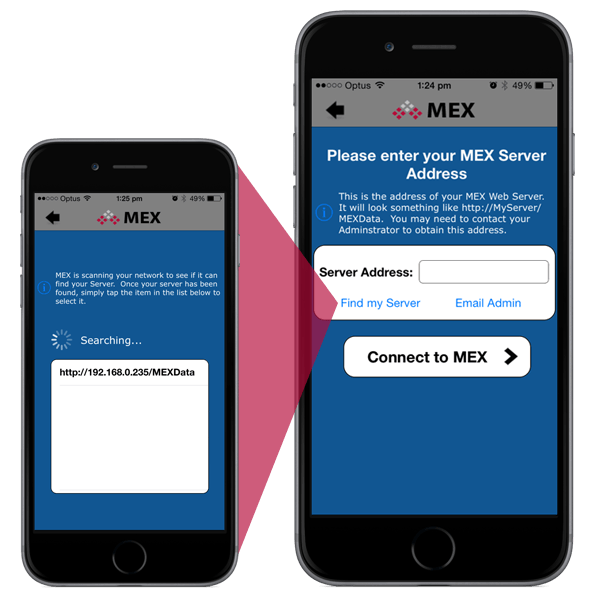
Using Find my Server on the MEX iOS app
Manually Entering the Server Address
If you know the address of your server, go ahead and type it into the server address field on the connection details form.
If you don’t know it, the easiest way to find it is to open MEX 14 and look at the URL at the top of the screen. Once you’ve found it, enter it into the server address field and tap Connect to MEX.

Example of a MEX Server address in Internet Explorer
For our hosted customers, we send out an email with the address. If you don’t have the email, just pull the address from MEX 14 as explained earlier.
Multiple iPad Setup
So now we’ve got one iOS device set up, only 59 to go. I know, setting up all the other devices like this, one by one, would be frustrating. But there is an easier way, apple have a number of management tools allowing multiple devices to be set up easily.
Here is a link to help you out: Enterprise iPad deployment
So now you can go back to your boss, with all 60 iPads set up and ready to go.
Questions?
If you have any questions about the MEX iOS app please contact the MEX Sales team at support@mex.com.au or call +61 7 3392 4777.