
How do Reports work in MEX
We spend most of our time entering information into MEX, but what happens when we need to get information out?
MEX has hundreds of standard reports, each specifically designed to export data in a certain way. Some may fill your requirements, but for the ones that don’t, you have the option to edit them and make them work the way you want them to.
Additionally, you can create a new report which could be unlike any standard report currently in MEX.
In this article we take a look at modifying Statutory Reporting in the MEX Maintenance Software.
How do I edit MEX reports?
In MEX 14 you can’t directly edit reports. We use another program called MEX Utilities which can be accessed in one of two ways:
- The first is by going to Reports in the Control Files - You then open the details of the report and click Design. This will automatically download Utilities and open up the report designer with the report open.
- The second is by going Tools Menu -> Open MEX Utilities - This will bring you to the Utilities menu. From here, go to Reporting & Security and then Design Reports. You will see a list of all the available reports in the system.
Now, before we look at editing a report, you should always take a backup of the original, just in case.
Backing up A Report
Backing up a report in MEX is simple.
- Click on Tools -> Open MEX Utilities
- Click on Reporting & Security in the MEX Utilities menu
- Click on Design Reports in the Reporting menu
- Select the Report you intend to work on
- Click the Export Report XML button
- Select a destination to store your report back up
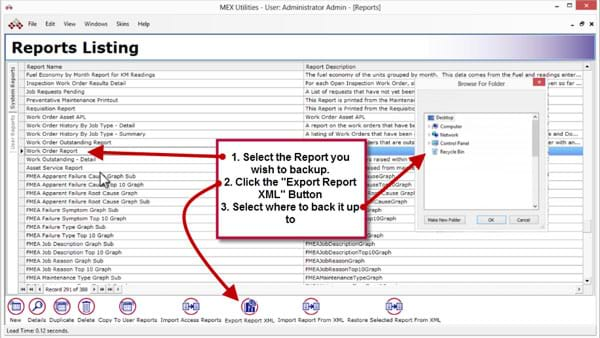
Backing up the Work Order Report in MEX
You can then later restore the report by using the button Restore Selected Report from XML and navigating to where you saved it previously.
Editing a MEX Report
Now let’s get started:
- Go to the Reports listing in MEX utilities.
- First, with the Work Order Report selected, back it up.
- Once this is done, double click it and then click the Design button.
- You can see now we have the report opened in design view. On the left hand side we have a Toolbox with various different types of controls, such as a label, check box and picture box.
- On the top right hand side we have a Field List for the Work Order and on the bottom right we have the properties list for the control selected in the drop down just above.
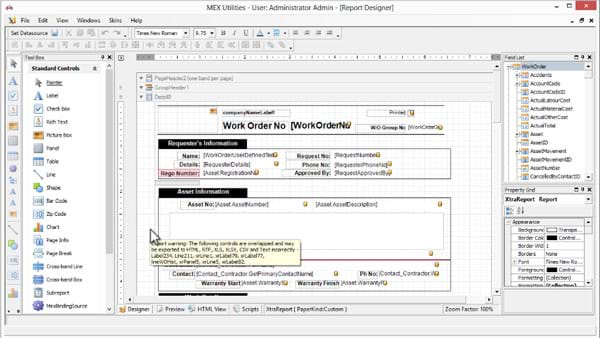
The Report Designer View in MEX
Adding Fields to a Report
Adding fields is as simple as clicking & dragging a field from the Field List onto the page. But let’s say we wanted the comment field of the work order asset’s parent on here.
- First, we expand the Asset node in the Field List, this gives us the Work Order Asset’s properties.
- Then expand Asset_Parent and this gives us the Parent Asset properties.
- Finally, drag the comment field under that onto the Work Order report.
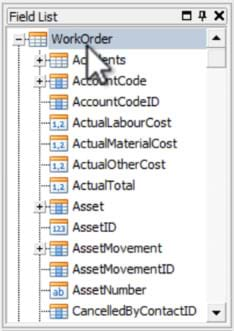
Field List in WO Report
What are all those yellow cylinders
If you look at the right hand side of the newly added field, you’ll be able to see a small yellow cylinder. In fact, many fields on the work order have it – this indicates that the field connects to the data source and will change when the report is generated. The one we just added, will change to the parent asset’s comment field.
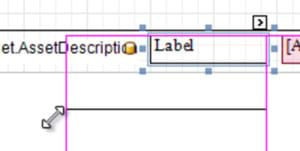
Adding a Label to the Field
Next, let’s drag a label next to the field so we have some indication of what the field represents.
- In your Toolbox on the left hand side, click & drag label just to the left of the parent comment field we added before.
- To change the text you can either double click the label or use the properties in the bottom right and change the text property.
It’s in the properties where we can change the font color, size, alignment and more.
Keep in mind, if you make a mistake you can use Ctl+Z to undo, or with a selection press Delete on the keyboard to remove it completely.
A4 or Letter?
A common problem I hear is you find that a report doesn’t look like it fits to the page properly when you print it. You can use the drop down above the properties to select the XtraReport and then modify the Paper Kind property to something that matches your printer settings. Set this to your preferred paper size, mine would be A4.
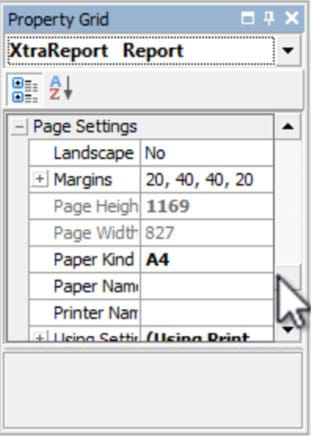
Setting paper kind to A4
Adjusting Report Items Dimensions
You’ll notice that with any control selected there are 8 small squares around it. Clicking and dragging these will allow you to change the dimensions of any selectable control. You can also use the toolbar at the top of the screen to change the font type, size and alignment of the selected label or field.
Resizing a Label in MEX
Previewing Your Changes
If you’re happy with the changes we’ve made, use the preview button down the bottom left to see how your changes impact the report when it’s generated instead of seeing it through the designer view.
I invite you to really play around with all the different controls, assuming you took a backup. There is a lot of power here and different functionality that we just can’t get into in one article.
MEX Report Writing Course
However, MEX provides a Report Writing Training Course that goes over a day and has a more in depth look at reports.
Follow this link to find out more about the MEX Report Writing Course.
Specifying Report Parameters
Now once you’re done modifying the report, press the lower x at the top right of your screen to save and exit back to the report details. Here, by ticking boxes, you can enable and disable the different types of parameters available to you when you generate the report in MEX 14. The checkboxes that are greyed out are irrelevant to the type of data the report contains.
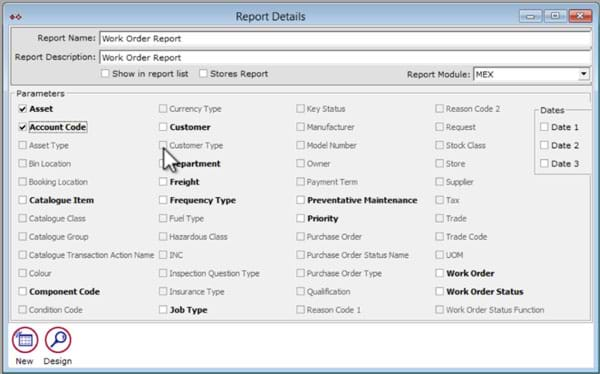
Specifying parameters on your reports details
Starting Fresh
You can create a completely blank report from here or in the behind listing as well by clicking the New button. Make sure you tick Show in Report List just below the description if you want to view it in MEX 14. In the designer, before Fields are available, you have to select the data source using the button on the top left. After this, you can build a new report using the techniques in this article.
Need a hand with your reports?
Practice makes perfect with report writing and I encourage everyone to have a go.
But, if you need a more complicated report written or just don’t have the time, we have people that do this every day and can turn your idea into reality.
Give the MEX support team a call on +61 7 3392 4777 or email support@mex.com.au and they will be able to direct you in the right direction.
To see more from Maitland Explains, subscribe to the MEX YouTube Channel and watch the collection of Maitland Explains Series